
I have been using Cloudflare for my websites for many years and have recently discovered that you can actually get a free 15 year SSL cert to enable https for free. Up until now, I have been using ssls.com, which is cheap but requires an annual review, which is annoying. Having found some guides online, I found myself struggling to set this up, even wondering if it was even possible to use for a standard WordPress website, well turns out it is and here is how to do it.
I want to put some context down first, just so people can adjust some of the steps to fit the webserver or unique setup that you might have. The bottom line is that the Cloudflare origin SSL certificate will allow you to enable https on your website without having to pay any money.
Cloudflare Origin SSL Certificate Setup Requirements
To start out, you will need to make sure you have the following things setup and be familiar enough with installing SSL certs to begin with as this is a little more complicated compared to the standard setup process for WordPress related things.
- FTP access to your websites home directory (in case you have config files that need updating, which may be the case for wordpress installs)
- Access to the webserver config files (typically /etc/apache2 or /etc/httpd for apache on ubuntu or centos servers)
- Access to cloudflare dashboard
- Optional: Access to your database (via phpmyadmin most likely) in the event that something goes wrong.
If you have all of this, then you are good to go.
Limitations of the Origin SSL Cert – What is the Catch?
SSL certs normally cost a bit of money, why is it that this certificate from Cloudflare is free. Surely they want something in return? Well, there is a catch, but for most people, it is such a small catch that it won’t be a problem at all. There is one rule to using the Cloudflare cert and this is it.
You must always use the Cloudflare proxy on the domain the SSL certificate is installed on.
If you bypass the Cloudflare proxy for some reason, the self-signed certificate will give a warning to any user trying to connect to your website saying that the site might not be safe. For most people, you will always want to be behind Cloudflare’s proxy, as this is how they cache your assets. Just be aware that using this certificate, pretty much locks you into using Cloudflare until you decide to pay for an SSL cert.
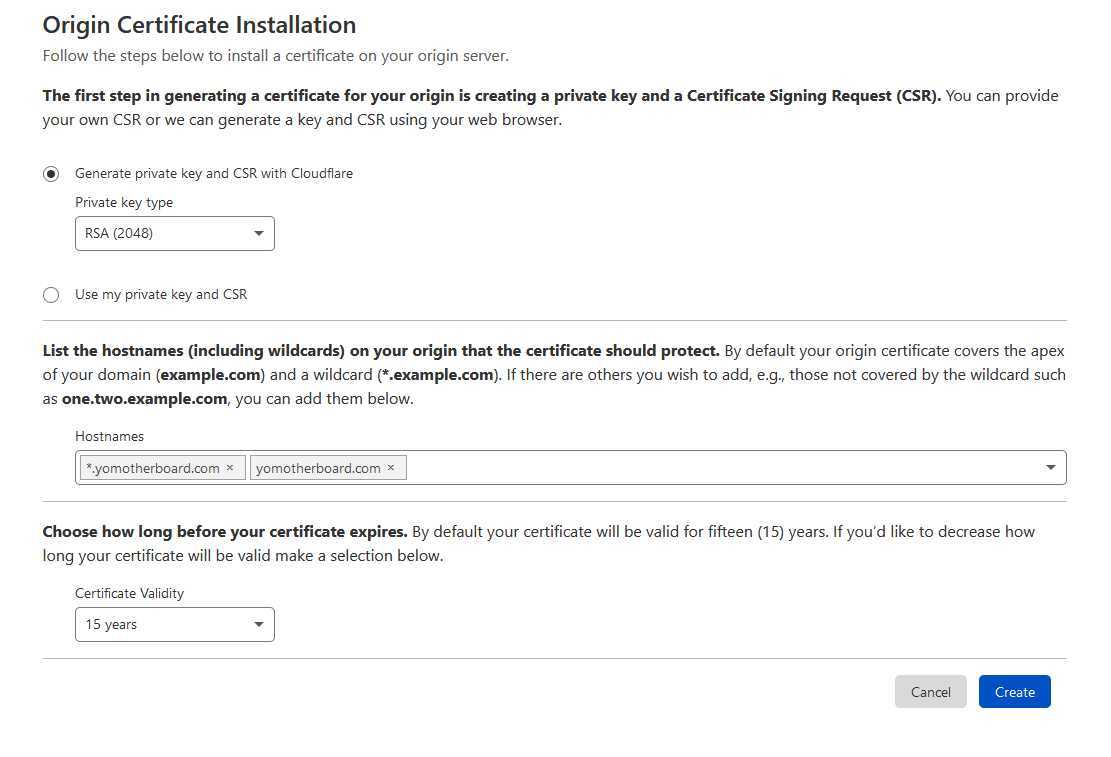
Create the Origin SSL Certificate
This step is super simple and can be done via the Cloudflare dashboard. Head over the SSL tab and then select origin in the sub-tab. From here you will be able to click the button to begin the process of creating the SSL cert and the private key you need to encrypt the requests.
Download The Cloudflare Root Certificate
This step is apparently optional but I could not get it to work without having the root certificate installed so you will need to download the Cloudflare root certificate from this link. You will need to download this to your computer and keep it with the other two files you downloaded from the previous step. You should now have two .pem certificate files and one private .key file.
Installing the Cloudflare Certificate On Apache/Linux
This step may vary for some, I use Apache on Ubuntu and CentOS so I can provide some instructions here. Generally, the process should be more or less the same for any Apache server or even any Linux based server. If you are using IIS on a Windows machine, the process is going to be different and you will have to look this up.
Copy Certificates & Private Key
Copy the .pem and .key files to a secure folder on your server. I usually put them inside a subfolder of the directory where apache keeps the config files. This means they cant be read by anyone without root access to your server.
/etc/apache2/certs
Create the Virtual Host
Open up the config file for your server and add a new virtual host for your website. Inside this node, you will need to provide the path to the certificates that you installed in the previous step.
<VirtualHost *:443>

    SSLEngine on
    SSLCertificateFile /etc/apache2/certs/website/website.net.pem
    SSLCertificateKeyFile /etc/apache2/certs/website/website.net.key
    SSLCertificateChainFile /etc/apache2/certs/website/origin_ca_rsa_root.pem
    .
    .
    .
</VirtualHost>
Test The Config And Restart The Server
Again, this part is going to be apache specific, restarting IIS is quite easy to do via the IIS manager so any Windows users will find this nice and easy. For those using Apache and Linux command line, here is how to get your nice new Cloudflare SSL certificate up and running.
Start by running the following command. It will check the config file to make sure there are no mistakes that could potentially bring the webserver down if you were to restart. Do not worry, this is just a safety check, running it will not impact the server in any way.
apachectl configtest
If everything comes back clear, you can run the command to restart apache. Depending on the OS and the name of the package, it might be something like
Service apache2 restart or service httpd restart
The server should come back online and you will be able to move onto the final step. If the server fails to come back online, do not panic. The quick solution, if you have other sites on the same server is to delete the new virtual host you have added, save and restart the server. Once it is back online, you can check the logs to see what caused it to go offline. I will add some of the common issues I hit while doing this at the bottom of the post to help you fix the problem if you hit any of the issues I did.
Feel free to provide any feedback such as workarounds to any problems you encountered in the comments section below to help others out.
Update Your Website & Redirects
Once the certificate is live, you will need to correct any base URLs that are in your websites config. These are typically the domain name of your site and will be appended in front of CSS, js and image files. If you fail to update these, you will get a broken padlock in the URL bar to say that even though this is an HTTPS connection, you are serving assets over a non-secure HTTP connection.
If you are using WordPress, this will require you to update the path of your website. Make sure both of the URLs here include HTTPS. This can be done under
Settings->General->WordPress Address (URL)
You can also do it in the database if you find the redirects are making it difficult to access the WordPress admin area.
For any custom website, you should have enough knowledge of your own site to know whether any base URLs need to be corrected and how to do it.
Once you have updated the URLs, it will be safe to go to back to the Cloudflare dashboard and force HTTPS for all requests. If you find you are stuck in a redirect loop, you may have an issue with the config on your website or server that is forcing the redirect back to HTTP when Cloudflare tries to force it to HTTPS.
Cloudflare Origin Cert and Key do not Match
As someone who has installed quite a few SSL certs in the past, I don’t know how I ended up having this issue so many times. Maybe the generation tool is a bit off or something but if you get this error, do not worry, it is easy to fix.
Since the origin cert tool will not allow you to gain access to the private key after it is first generated, you will need to create a new origin cert by following the step above again. It should only take a second. Make sure you carefully copy and paste the key and cert over to the webserver and do not mix them up. Once installed, you should be able to restart the server to fix the problem.
Stuck In A Redirect Loop After Installing Certificate
This often happens when you have set a redirect to force HTTPS but a separate config has a redirect that forces HTTP. Quite often, it will be Cloudflare forcing HTTPS, so you may be able to temporarily turn this off to regain temporary access to your website.
Check the webserver config files to make sure that you are not doing anything that would redirect a https request to HTTP. IF this looks good, check the website config. For the likes of WordPress, failure to set the correct site URL in the settings page can cause this kind of behaviour. If you can no longer access the admin area, you will need to update the value manually in the wp_options table of the database.