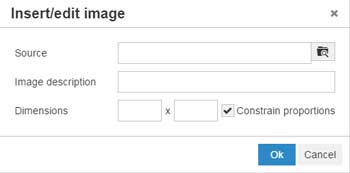
This tutorial will show you how to take the media manager from WordPress and use it on an external page with a stock version of TinyMCE. I saw some posts about this and people were calling the WordPress editor to achieve this. Its an option, but it is not what this guide is for. If you have downloaded a standard version of TinyMCE and want the be able to browse and upload images using the WordPress media manager then this guide will show you how to do it. There are several file managers for TinyMCE, all which work perfectly fine. I have always found the WordPress media manager to be very powerful and easy to use. Unfortunately its part of WordPress and cant be downloaded on its own. Thankfully I have been able to find a way to use the media uploader within TinyMCE a lot more easy than i though. Here is how to use WordPress media manager with TinyMCE.
The first thing you will need to do is be able to load up the WordPress media manager on the page you are using. This means you need to either load the core of WordPress or just call the media method from WP. The following code will load the WordPress core and que all of the files you need to be able to call the media manager.
require_once( 'wp-load.php' );
wp_enqueue_media();
The next thing to do is create a javascript function that will load up the WordPress media manager. The following function will do this and will then return the selected image to the instance of TinyMCE that triggered it. The reason for this, is you may have more than one instance of TinyMCE on the page and you want to make sure you return data to the correct one.
<script type="text/javascript">
function wpmediabrowser(field_name, url, type, win)
{
	var image = wp.media({
		title: 'Upload Image',
		multiple: false
	}).open().on('select', function(e){
	var uploaded_image = image.state().get('selection').first();
		jQuery("#" + field_name).val(uploaded_image["attributes"]["url"]);
		var arr = field_name.split('-');
		var field = arr[0];
		var number = parseInt(field.split('_')[1]) + 1;
		var descriptionid = field.split('_')[0] + "_" + number;
		jQuery("#" + descriptionid).val(uploaded_image["attributes"]["description"]);
	});
}
</script>
You can test if the function works by calling it using a href. The final step to do is to link this function in with the init of TinyMCE. The following code is all you need
"file_browser_callback: wpmediabrowser,";
This variable in the TinyMCE init will tell the app that you are using a file manager and to call a function called “wpmediabrowser” when the browse button is clicked. When you select the image from the WordPress file manager it will return the image url back into the box.


Hello Dan, thanks for posting this, but I’m unsure how the wp javascripts get loaded. You say just call wp_enqueue_media() but that just queues them in php, but doesn’t send them to the browser, so wp.media() is not available in wpmediabrowser(). There seems to be something missing after wp_enqueue_media(). Please could you check your source code and advise what’s missing? Much appreciated.